Hi Crafters!
Welcome to the Crazy Crafters Blog Hop this month, featuring special guest Jeanette Egemann from Germany! The Crazy Crafters Team have been busy selecting one of Jeanette's creations to CASE (copy and selectively edit) and I'm sure you'll be delighted with all the wonderful items we have created. So grab a cuppa, pull up a chair and enjoy...
I have chosen this beautiful Everything Eleanor card of Jeanette's to CASE, as I liked the flourish and colours used:
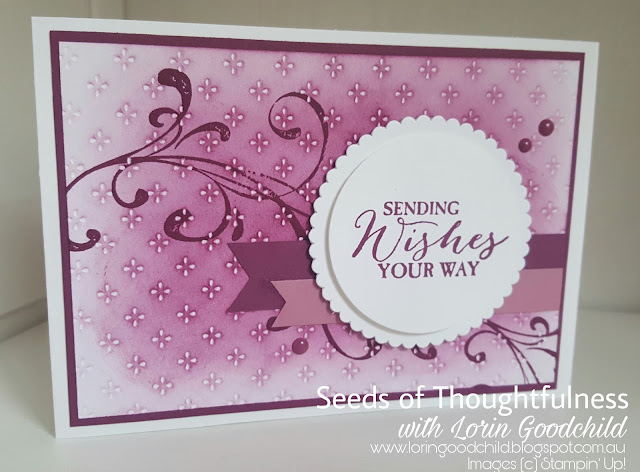
This was my CASED version I made:
Jeanette had used a retired In Color, Blackberry Mousse, so I opted to go with Rich Razzleberry, a lovely rich plum colour.
The card base was layered with Whisper White & Rich Razzleberry & topped with a white embossed/ patterned sheet from the Fancy Frost Specialty Designer Series Paper. To get the lovely background, I sponged on the ink using Rich Razzleberry on the flat side of the embossed paper, before stamping on the Everything Eleanor flourish stamp. I have used retired products for both of these, however you can easily replicate this by:
- Running your white cardstock through your Big Shot machine using an embossing folder of your choice (inking the flat side, not the raised side), or
- Heat emboss a stamped pattern of your choice onto white cardstock using versamark, white embossing powder and heating it to create your pattern. Then sponge over your embossed pattern with your desired ink colour.
The Everything Eleanor flourish stamp can be replaced with the current Flourishing Phrases stamp set (which I don't own as of yet) and I then added two strips of Rich Razzleberry and Sweet Sugarplum cardstock, using the triple banner punch to shape the ends. The sentiment from Butterfly Basics was stamped on a layered circle and scalloped circle from the Layering Circles Framelits Dies, and finished off with Rich Razzleberry enamel dots.
Tip: Another lovely option instead of the scalloped circle layer under the sentiment is turning over a large metallic foil doilie so that you have the white side facing up, and then place a circle-cut sentiment over this, keeping the border visible.
I hope you liked my card and was inspired in your crafting journey! Please feel free to leave a comment as I would love your feedback. There are many more creations you won't want to miss, so make sure you check out the next person on the list below:
Recommended Products:
You can purchase these items from my Online Store 24/7. Remember to use the June Host Code DNQPMS6Z at the bottom of your shopping cart to receive free rewards for shopping with me (only available in Australia).
See you next time,
Lorin xx


So pretty, nice work.
ReplyDeleteThe original cards are so pretty Lorin and you havemade them just as beautiful all while keeping that same elegnace. I adore that set for it's flourish and is so very perfect for this pretty and elegant style. x
ReplyDeleteOh so gorgeous. Love the colours and the classic elegance.
ReplyDeleteLove your card! Thank you so much for caseing me and being part of this blog hop!
ReplyDeleteJust beautiful, love your sponged background. Sets the card's mood for the beautiful colours chosen. Angexx
ReplyDeleteGreat work Lorin....gotta love sponging
ReplyDeleteLovely Lorin. I love the enamel shapes, it adds that little extra.
ReplyDeleteI've not used RR much, but I really like how you've used it! I think I need to play with it some more!
ReplyDeleteI loved everything Eleanor, unfortunately it's not in my stash anymore, beautiful card!
ReplyDeleteBeautiful card Lorin and a great CASE.
ReplyDelete