Sunday, 14 May 2017

Sneak Peek - Pick A Pattern


2017/2018 Annual Catalogue Card Swap

"A Patterned Hello"

As a Stampin' Up Demonstrator we have the ability to view the new Stampin' Up! 2017/2018 Annual Catalogue early and can preorder a select range of new products a month earlier than the general public.  This year, I got offered a chance to participate in the 2017/2018 Annual Catalogue Card Swap with a group of ten other demonstrators, and I selected the Pick A Pattern Suite as my starting point for my card creation "A Patterned Hello".  

I love this range as it suits teenage girls down to a T.  It is funky, fresh and vibrant and yet still offers some versatility as some patterned pages suit boys, some girls, and also for a range of ages,  This is the card I created:


When making a number of identical cards it really is key to keep it simple.  You don't want to be spending three hours on one card, to have to replicate it over and over and over again. So for this card I selected the floral flirty flamingo cardstock from the Pick A Pattern Designer Series Paper set.  Because this set is very detailed and also features a unique colour palette, I wanted the paper to stand out and be the main base element of my card.  


I started with Flirty Flamingo cardstock for my card base, layering it with Whisper White.  I then cut 4 squares of 1.5" x 1.5" in the patterned DSP and adhered these to the card, spacing them out approximately a centimeter from the card edge & each other.  The sentiment "Hello There" from the Pieces & Patterns stamp set suited this paper perfectly, and I decided to gold emboss this onto white cardstock.  I layered it with the scallop circle from the Layered Circles framelits set using dimensionals, and placed gold trim underneath to add some interest and pretty it up a bit.  

Stamping Tip:
You can adhere ribbon & trim using double sided tape, multi-purpose glue or glue dots, but when you use very thin trim, like the gold trim used on this card, or need to make multiple cards in a hurry, it is a lot quicker & fuss free using double-sided tape as shown below:-


I love how this card turned out - simple but effective.  If you would like to purchase the products used in this card, they will be available come the 1st June 2017.  Want them earlier? Sign up as a demonstrator today and you can preorder them to start playing with them earlier!

Products Used:

Cardstock:
Whisper White
Flirty Flamingo
Pick A Pattern DSP

Stamp Set:
Pieces & Patterns

Dies:
Layered Circle Framelits

Embellishments:
Gold Trim

Other:
Versamark Pad
Embossing Buddy
Heat Tool
Gold Embossing Powder
Dimensionals
Adhesive

NEW PRODUCTS COMING SOON:


Thank you for stopping by my blog today and viewing my card creations.  I hope you liked my cards and were inspired on your crafting journey.

See you next time :)

Lorin xx

Sunday, 7 May 2017

Crazy Crafters Blog Hop with Lea Denton - May 2017

Hello and welcome to the Crazy Crafters Blog Hop with the very talented Lea Denton as our Special Guest! 


Lea Denton is a well known UK Independent Stampin' Up! Demonstrator, and as part of the blog hop we have the privilege of selecting one of Lea's creations to CASE (Copy & Selectively Edit). 

I have chosen to CASE Lea's Watercolour "Rose Garden" Card:


I love this card for it's simple elegance and ability to be used for any occasion by switching the sentiment.  The Rose Garden thinlits are beautiful and can be used in such a variety of ways, and the watercolour effect was unique and added to the overall look of the card.

From Lea's card, I took inspiration from the Rose thinlit cutout, and also the watercolour background...

   
My main feature was the Island Indigo Rose die-cut that I specifically chose in a darker, regal colour for it to stand out.  Lea had played around with water colours using liquid ink drops, however I did not have these on hand so I used ink pads & water and brushed the colour onto watercolour paper to create my background, using Bermuda Bay and the 2016-2018 In Colors Dapper Denim and Sweet Sugarplum.  I finished it off with gold sequin trim & the "Thank You" sentiment from the "One Big Meaning" stamp set that I embossed in gold, then layered with Island Indigo using the layered circles framelits.


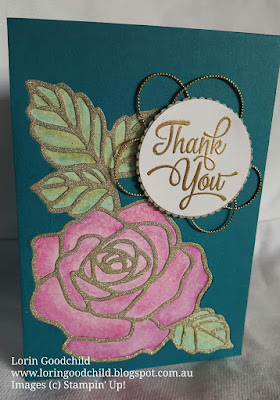
My next card I decided to take from Lea's card the glimmer paper for the rose die-cut, and again used water colour but in a different manner.  For this card I used the Rose Garden thinlits to cut out the frame on the Island Indigo card front, then cut out the same in gold glimmer paper.  I attached watercolor paper behind the card front, and attached the gold glimmer rose frame onto this.  Using watercolor pencils I coloured the rose in, giving it a simple but beautiful water colour effect.  I used the same gold embossed sentiment as the card above, this time using gold glimmer paper for the layered scalloped circle behind the sentiment, and gold twine to finish it off. 


You are currently on my blog - Lorin Goodchild.  Make sure you check out the list below to see who is up next, and be sure to hop around to them all as there is some awesome inspiration to be had!


Product List


Thank you so much for coming to my blog today - I hope my cards have provided you with some inspiration on your card-making journey. I definitely recommend you get your hands on the new Stampin' Up! Watercolor Pencils as they make water colouring SO easy!

Until next time...

Lorin xx