Thursday, 29 June 2017

A Little Wild

Hi Crafters,

Have you ever picked up a stamp set and just can't put it down because the possibilities are just endless? What started off as a day designated to catching up on housework, a few errands and appointments, ended up in a full afternoon and evening playing with this stamp set! Today I am going to share with you an adorable new stamp set "A Little Wild" that is perfect for baby cards, gift tags, etc.  

A Little Wild 

A Little Wild features three delightful characters - a lion, honey bear and elephant, and comes with a range of complementary stamps to create a variety of images or backgrounds.  Once I sat down and started creating with this set, I couldn't stop... grab a cuppa, pull up a chair and check out my latest designs...

A Little Wild - Honey Bear Baby


I was wanting a honeycomb effect for the background, and Stampin' Up! features a number of items that hit this nail on the head in a variety of ways, from their Hexagon Dynamic Textured Embossing Folder to their Fabulous Foil Designer Acetate sheets.  I opted for the foil acetate sheets as they provided a lovely backdrop which didn't detract from the cute stamped images I wanted to be the main focal point. The card base used was Crumb Cake, layered with Very Vanilla.  


The honey bear, bee hive, bees and sentiment are all from A Little Wild stamp set. The sentiment is stamped in Pear Pizzazz ink, and the edges of the stitched circle cutout & the honey bear are daubered around the edges in Sahara Sand.  Burlap Ribbon, a strip of Pear Pizzazz cardstock & gold ribbon trim were added to make the central images pop, and the bees were raised using mini dimensionals to create a 3D effect. 

A Little Wild - Elephant Baby


For this card, my main intention was to having water shooting out the elephants trunk... easier said than done! I debated using the new embossing paste mixed with soft sky ink, and in the end opted to heat emboss the water drops using a retired stamp set.  So my apologies, as I have used retired product on this card.  The cardstock includes Whisper White, Pool Party, Berry Burst & Pop of Pink Designer Series Paper (retired).  The elephant was stamped using A Little Wild stamp set in Memento Black Ink, and I heat embossed the heart & water droplets using a retired whale stamp set.  


Metallic black sequins were used, as was the lovely new Pool Party 3/8" Shimmer Ribbon.  The sentiment was taken from the Baby Bear photopolymer stamp set.

A Little Wild - Lion Baby


Aren't these animals just adorable?!? And this lion is no exception.  Teaming the Calypso Coral cardstock with Night of Navy, Pool Party & Whisper White, this card is nifty for a newborn baby or for a toddler/ children's birthday card.  Simple but effective, the card was finished off using calypso coral enamel dots.

  
A Little Wild - Marbled Honey Bear


My last card was centred around the marbled background, easily created using the Marbled Clear Mount Background Stamp.  

Stampin' Tip:
The trick with using these large background clear stamps is to remove the sticker paper off the back of the stamp but DO NOT adhere the clear printed sticker on the back! This enables it to stick easily and smoothly onto your large clear block, providing a seamless flat stamped image. Alternatively, if you do not own a large clear acrylic block to adhere your stamp to, you can buy the wood mount stamp which is only a couple of dollars more.

This shaker card used a base colour palette of Soft Sky and Whisper White.  The sentiment was taken from the Floral Phases stamp set, and heat embossed using Silver Embossing Powder.  Using the Layering Ovals Framelits Dies, I used my Big Shot machine to cut out the oval and scalloped oval shapes on Whisper White cardstock, and also my marbled background cardstock.  A clear acetate sheet was placed underneath the marbled background cutout, and foam strips adhered to create a shaker, 3D card.  Silver metallic sequins were placed inside, and the marbled layer was raised using dimensionals.  


To finish off the card, the honey bear and bees were stamped in Early Espresso, and coloured in using an aqua painter & ink.  The leaves were punched out using a retired bird punch, and the flower was diecut from the Flourish Thinlits Dies, in Berry Burst & a Rhinestone Jewel placed in the centre.

I hope you have liked the cards on display today and inspired you to try out some new stamps and background ideas.  

Till next time, have a lovely day :)

Lorin xx

Sunday, 18 June 2017

Crazy Crafters Blog Hop with Jeanette Egemann - June 2017


Hi Crafters!

Welcome to the Crazy Crafters Blog Hop this month, featuring special guest Jeanette Egemann from Germany!  The Crazy Crafters Team have been busy selecting one of Jeanette's creations to CASE (copy and selectively edit) and I'm sure you'll be delighted with all the wonderful items we have created.  So grab a cuppa, pull up a chair and enjoy...


 I have chosen this beautiful Everything Eleanor card of Jeanette's to CASE, as I liked the flourish and colours used:


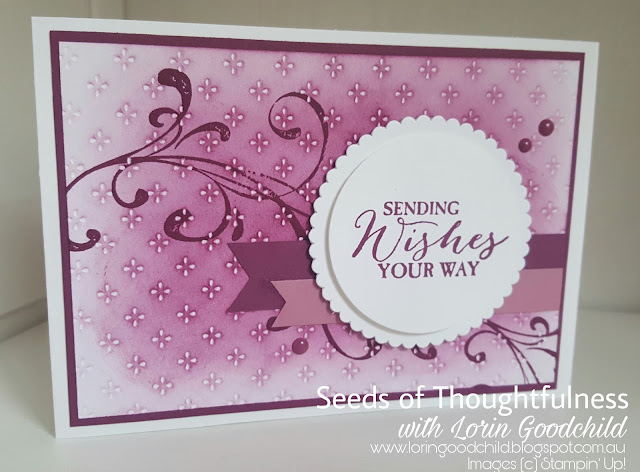
This was my CASED version I made:


Jeanette had used a retired In Color, Blackberry Mousse, so I opted to go with Rich Razzleberry, a lovely rich plum colour. 

The card base was layered with Whisper White & Rich Razzleberry & topped with a white embossed/ patterned sheet from the Fancy Frost Specialty Designer Series Paper.  To get the lovely background, I sponged on the ink using Rich Razzleberry on the flat side of the embossed paper, before stamping on the Everything Eleanor flourish stamp.  I have used retired products for both of these, however you can easily replicate this by:

-  Running your white cardstock through your Big Shot machine using an embossing folder of your choice (inking the flat side, not the raised side), or 

-  Heat emboss a stamped pattern of your choice onto white cardstock using versamark, white embossing powder and heating it to create your pattern.  Then sponge over your embossed pattern with your desired ink colour.


The Everything Eleanor flourish stamp can be replaced with the current Flourishing Phrases stamp set (which I don't own as of yet) and I then added two strips of Rich Razzleberry and Sweet Sugarplum cardstock, using the triple banner punch to shape the ends.  The sentiment from Butterfly Basics was stamped on a layered circle and scalloped circle from the Layering Circles Framelits Dies, and finished off with Rich Razzleberry enamel dots.  

Tip: Another lovely option instead of the scalloped circle layer under the sentiment is turning over a large metallic foil doilie so that you have the white side facing up, and then place a circle-cut sentiment over this, keeping the border visible. 


I hope you liked my card and was inspired in your crafting journey!  Please feel free to leave a comment as I would love your feedback.  There are many more creations you won't want to miss, so make sure you check out the next person on the list below:


Recommended Products:


You can purchase these items from my Online Store 24/7.  Remember to use the June Host Code DNQPMS6Z at the bottom of your shopping cart to receive free rewards for shopping with me (only available in Australia).

See you next time,

Lorin xx

Saturday, 17 June 2017

Badges & Banners - No. 1 Champ

As a Mother to two boys you would think I'd be flowing in creative juices for boy/ male cards... but alas, my tendencies towards pinks and purples remains, stronger than ever. But as I was tinkering around yesterday playing with my craft items, the Dapper Denim, Calypso Coral and Garden Green colour combination lit my spark and I was off creating these two...

Badges & Banners 
"No. 1 Champ"


The Badges & Banners stamp set is awesome in that is comes with 7 rubber stamps, featuring a range of different shaped banners with versatile sentiments, making this set great for graduation or academic/ sporting accomplishments, birthdays, friendship or baby cards.  And with a coordinating Best Badge Punch, it makes it quick & efficient at whipping out multiple when making a handful.

On the first card, I opted for a garden green cardbase topped with Smokey Slate & then Whisper White.  The background stamps were from the Timeless Textures stamp set, and Oh So Eclectic stamp set.  I made the error of embossing in white the crosses before I stamped the dapper denim crosses, and as most of you will know, once you stamp over white embossing it just wipes (or smudges) off. So error learnt for doing it next time!  The card was finished off with silver metallic thread, and dapper denim enamel dots.


The second card I played around with circles cut out using the Layering Circles Framelits Dies and my Big Shot.  Once my layout was to my satisfaction, I layered ribbon down and also two strands of metallic silver thread before placing my layered badge on top.  Simple but effective, and great for any age.


Products Used:


You can purchase these items from my Online Store 24/7.  Remember to use the June Host Code DNQPMS6Z at the bottom of your shopping cart to receive free rewards for shopping with me (only available in Australia).

Also be sure to check out the NEW June Craft Kit released this month - $55 including postage & handling within Australia!  


If you liked my cards today, please feel free to leave a comment.  Hope they have inspired you!

Have a lovely day and hopefully I'll see you again soon,

Lorin xx

Thursday, 15 June 2017

Stampin' Dreams Blog Hop - June 2017


Welcome to the Stampin' Dreams Blog Hop, running monthly. You are currently visiting Seeds of Thoughtfulness with Lorin Goodchild from Australia. I hope you enjoy my cards showcasing my favourite Carry Over Products from the old catalogue to the new one.


Picking your favourite stamp set is easy, right? Wrong!  Not when I have a few... okay, a couple... hmm maybe a few more than that lol 

In the end I opted to go with the lovely Stampin' Up! Watercolor Wings photopolymer stamp set. This butterfly stamp set features multi-layering with the stamps to create different tones or colour effects.  

I've recently obtained mini blending tools and have been dying to try to them out, especially as I struggle a bit to master backgrounds that look flawless.  You know the beautiful sunset backgrounds that send you straight to thinking of waves crashing on the beach, soaking up the sun, cocktail in hand... (can you tell I really want a nice summery holiday... am SO over winter and we are only two weeks in lol) Anyway, back to card making...  so I started with spongeing my background on using these mini blending tools.  Now if you don't own these yet, I definitely recommend you get your hands on some!  They are super easy to use, and come with a few removeable sponges which make for easy cleaning so you don't need to buy one per ink colour.  The trick to making these look well blended and even, is to start blending in circular motions off your cardstock and then gently go over your cardstock, continuing the circular motions and reapplying ink as required.


I opted for Lemon Lime Twist, Bermuda Bay & Island Indigo as my base colour palette.  From there, I stamped my butterfly, sticking with the same colours. And decided to make it pop with some embossed gold on the outter wings.  To assemble the card, I used gold foil cardstock as a background base for my sponged background art, then cut out the star lattice shape from the new Eclectic  Layers Framelits Dies, and raised this using the new mini foam dimensionals. 


I then used some gold metallic thread, and again used mini foam dimensionals to apply my butterfly on top, applying a touch of Wink of Stella Glitter Pen to the inner wings for a subtle metallic sheen.  I debated applying a sentiment and in the end decided against it, as I will apply a gold embossed sentiment inside the card when I decide what occasion it will be given for.  This makes for a versatile card that is simple but sophisticated.


I hope the projects you've seen here on my blog today have inspired you & brightened your day. You are currently visiting Seeds of Thoughtfulness with Lorin Goodchild. Please see the list below & hop through all of the people on the list to see all our projects. You don't want to miss any!


Products Used:


You can purchase these items from my Online Store 24/7.  Remember to use the June Host Code DNQPMS6Z at the bottom of your shopping cart to receive free rewards for shopping with me (only available in Australia).

Also be sure to check out the NEW June Craft Kit released this month - $55 including postage & handling within Australia!  


Thanks for stopping by!

Lorin xx

Wednesday, 14 June 2017

RAK Group Card Swap - June 2017


Hey Crafters,

Cards these days seem to becoming a thing of the past. But not anymore!

Do you like to create, send & receive cards?!? Then the Random Act of Kindness Card Group is for you! You simply select whomever you would like to send a card to anywhere in the world from the list of participants, and you may very well receive some back! Too easy, right?  

This month I participated in the RAK (Random Act of Kindness) Card Swap using new catalogue products and gosh I blown away by the stunning cards I received back today (and no, there was no memo that they all must be pink lol Fortunately I LOVE pink)


The RAK card swap attracted so many participants that there were several groups established.  I had the pleasure of having the following people in my Card Swap Group (in no particular order):

-  Louise Sharp
-  Lou Kitzelman
-  Nicole Wilson
-  Karen Farquhar
-  Amanda Shields
-  Jessie Holton
-  Kayla Renee
-  Vicki Allanson
-  Nikki Miers

If you would like to participate in the Random Act of Kindness Group you can CLICK HERE

Stay tuned for my next blog post coming tomorrow evening, till then...

Lorin xx

Kylie Bertucci's International Blog Highlights - June 2017


Hello and welcome to Seeds of Thoughtfulness with Lorin Goodchild, 

Today I have the privilege of participating in Kylie Bertucci's monthly International Stampin' Up! Blog Highlights, which enables you to view all the creations entered and vote for your favourite. 

The theme this month is "Baby" - one of my favourites.  Here is my baby card I made:

Fly High Sweet Baby


This card was inspired by a quilt/ lattice background I had seen done by the very creative Holly Stene using the Foxy Friends stamp set (you can view Holly's beautiful card/s here).

I opted for a traditional colour palette of powder pink and whisper white for the baby girl card.  The hot air balloon was diecut from the Up & Away Thinlits, and I layered this to create a layered and bolder effect.  I used Wink of Stella to fill in the hot air balloon gaps, creating a sparkly, glittery background. The sentiment is from a retired Stampin' Up! stamp set, but you could easily replace this with a current sentiment, and I layered this with the powder pink/ soft sky cardstock and layering oval framelits.

If you liked my cards I would really appreciate you taking the time to VOTE HERE.  The top ten winners will get the opportunity to take part in an international blog hop.

Products Used:


Thanks for stopping by, enjoy the rest of your day!

Lorin xx