Thursday, 25 May 2017

Watercolour Play

Hello,

It's that time of year when the weather starts turning cooler.  Thankfully nothing beats staying warm indoors with a cup of tea, the smell of freshly made muffins wafting through the house and being able to sit down and experiment with watercolours for some cards.

I wish I could say my experimenting yielded awesome results, but it is still a work in progress.  At a craft market I attended last year, I had purchased a set of 12 Nuance Powders and I must admit, trying to replicate how bright and effective they are with Stampin' Up products is a bit of a challenge.  But I will persevere and get there! Eventually. lol 


I quite like how my watercoloured flowers turned out - Using the Stampin' Up! Sunshine Sayings stamp set, I white embossed the flower outline, then selected Berry Burst, Pumpkin Pie and Sweet Sugarplum and applied these using an aqua painter.  My aqua painter releases a fair amount of water while painting, and I found this beneficial in creating the watercolour effect relatively easily. I allowed them to dry naturally, adding more ink as required to darken the effect.  


To make the card, I opted for the beautiful new In Color 2017-19 Berry Burst cardstock and used the Fabulous Foil Designer Acetate (gold dot design) to create a bit of interest. The leaves were cut using the Flourish Thinlit Dies.  I heat embossed the black sentiment onto vellum, and this was framed used the Layering Squares Framelits. 


I hope you like the card I created, and inspired you to try your hand at watercolouring.  It is a technique that requires patience and experimenting with various colours, various paper cardstock and styles, but the end product can be amazing!

Recommended Products:


Enjoy the rest of your day and I'll see you again soon..

Lorin xx

Wednesday, 24 May 2017

Crazy Crafters Blog Hop - Annual Catalogue Sneak Peek


Hello & welcome to the Crazy Crafters Blog Hop - Annual Catalogue 2017/2018 Sneak Peek!

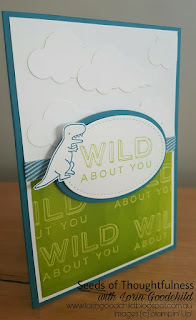
For this hop, I have selected the new "Pieces & Patterns" Stamp Set along with the cute little moose from the coordinating "Pick A Pattern" DSP.  Here are the two cards I created:


I wanted to do something a bit different this month, and introduced a technique a friend had showed me awhile back - making a glossy printed image using stamping.  This technique is really simple and was done by taking a piece of glossy photo print paper, and inking my stamp with versamark ink. I then stamped my image on the paper, and allowed it to dry (note: if you don't allow it to dry enough, the versamark will streak/ run and ruin your stamped image when you do the next step) I then used a brayer and inked it up using the Classic Stamp Pads.  For the moose card, I used Soft Sky, on the dinosaur card I used the new In Color 2017-2019 Lemon Lime Twist.  I then rolled the brayer over the glossy paper, reinking up as required, ensuring it was done evenly to distribute the ink.  I then wiped over this with a tissue to remove any reside.  The result is a beautiful glossy print, which in this instance I have used for my background elements on both cards.


For the moose card, I wanted my background to be the unique focal point, with my sentiment complimenting this.  The colour palette was crumb cake, soft sky & whisper white.  For the sentiment, I used the Stitched Layering Framelits, and the scalloped oval framelit for the background, using dimensionals to lift them up.  The moose was fussy cut from the DSP, and adhered onto the sentiment, and lastly white enamel dots were added to complete it. 

For the dinosaur card, I opted for Island Indigo, Lemon Lime Twist and Whisper White.  The dinosaur & sentiment were stamped using the "Pieces & Patterns" stamp set.  I used the chevron ribbon from the last Annual Catalogue, using my trimmer to cut this in half to reduce the thickness. The clouds were cut from the Up & Away thinlit set (these have been carried over into the new catalogue).


I hope you have liked the cards I have made & that it has inspired you in your crafting journey. You are currently visiting Seeds of Thoughtfulness with Lorin Goodchild. Please see the list below & hop through all of the people on the list - we have some incredibly talented people in our Crazy Crafters team!   

Products Used:


    -  NEW A4 Glossy White Cardstock (144241)

Note: Some of these products are only available to order from 1st June 2017.  


For more products and supplies please head to my Online Store.  Remember to use May's Hostess Code WSA6VG6V at the bottom of your shopping cart to receive free rewards from me at the end of the month (only available to Australian Residents).

Retiring Products only Available Until 31st May 


NEW - Eastern Palace Suite
Available in bundles for a short time only!
~ 1st to 31st May only ~


https://www3.stampinup.com/ECWeb/ItemList.aspx?categoryid=31028&country=AU&utm_source=olo&utm_medium=O1-ad&utm_campaign=new-olo-homepage

Thanks for stopping by today.  Please feel free to leave me a comment if you have liked my creations.  Have a great day & will see you again soon!

Lorin xx

Tuesday, 23 May 2017

Whitewash Technique

Hello and welcome back to Seeds of Thoughtfulness with Lorin Goodchild!

Today I want to show you a new technique called the "whitewash technique".  This technique is a nifty way of stamping images onto coloured backgrounds and being able to colour them in without the background colour influencing or shining through the ink used.  It looks very effective on paper such as Crumb Cake, especially if bright or bolder colours are used to colour them in.  

Step 1
First we are going to emboss your selected stamp image onto your cardstock using versamark & white embossed powder.  
To heat emboss, wipe down your cardstock gently with an embossing buddy (this eliminates static), stamp image using versamark onto your cardstock, apply white embossing powder & remove excess, heat with heating tool to get glossy image. 
Tip:  Ensure you select a stamp which has an outline with adequate space inside to colour/paint in the interior gaps.    

Step 2
Next get your white ink pad (or refill) and using an aqua painter filled with water, we are going to apply a white base coat of the ink & water to your embossed image. Depending on how dark your base cardstock is, you may need to apply more than one coat so that the base colour does not shine through. Allow this to dry completely before proceeding to the next step.
Tip:  To speed up the drying process you can use your heat tool to dry your whitewash.


Step 3
When your whitewash base has completely dried, we are going to colour in our stamp using our selected ink pads.  You want to select inks that are bright and bold in colour.. colours like Berry Burst, Melon Mambo, etc. I found the aqua pen gave off too much water for this step.  You can use blender pens if you prefer (I didn't have any on hand, so I used a fine tipped paintbrush to pick the ink off the stamp pad, then dipped it in a drop of water) and blended my stamped image.
Tip: If you are unsure what your colour is going to look like, or the particular shade, test a bit on a piece of scrap paper to ensure you have the colour you desire before inking your stamped image.


And that's it! Super easy and very effective! Here was my finished card creation using this technique:


Products Recommended:

Heat Tool
[129056]
$50.00
Blender Pens
[102845]
$17.00

Hope you have learnt something new today, and been inspired on your crafting journey.  Please feel free to leave a comment or if you have any questions about how to do this technique.

Thanks for stopping by, have a lovely day!

Lorin xx
      

Monday, 15 May 2017

A New Horizon

What's not to love about new Stampin' Up products?  The excitement and enthusiasm that leads up to a new catalogue launch is contagious and once I delved into the new 2017/2018 Annual Catalogue I couldn't put it down!

After making the card "A Patterned Hello" a few days ago using the absolutely gorgeous Pick A Pattern DSP (designer series paper), I couldn't stop myself thinking of new ways to put this set to good use.  It is definitely becoming one of my favourites!

A New Horizon

The card I created was not quite the way I first envisioned it, but I love how it turned out.  What I particularly like is that it is has a masculine feel about it.  It can easily be given to a teenage boy, and I decided against using a sentiment as I also thought this may detract from the circles and the layout/ impact of the card front as a whole, thus making it versatile for a range of occasions.


The Pieces & Patterns stamp set contains 14 rubber stamps that encompass background patterns, sentiments and some cute characters.  For this card I used five different background stamps to create the various patterned circles, and stuck with the complementary colours used in the DSP - Sahara Sand, Flirty Flamingo, Emerald Envy, & Crushed Curry.  Each circle was framed in black to make them pop, and the large circle I added another dimension by adding a circle window sheet, adhering another black frame & then gluing on the mountain scene that was fussy cut from the DSP. It was mounted with dimensionals behind the mountains, as was the top left circle.


The new products will be released 1st June 2017, but in the meantime CLICK HERE to shop online for supplies at my store.

Thanks for stopping by my blog today, have a lovely day!

Lorin

Stampin Dreams Blog Hop - May 2017


Welcome to the Stampin' Dreams Blog Hop, a monthly blog hop run by the lovely Jessie Holton.  You are currently visiting Seeds of Thoughtfulness with Lorin Goodchild, from Australia. 

The theme this month is to design a creation/ cards using retiring products from the 2016 Annual or 2017 Occasions Catalogues.  This is the card I created:

Carousel Birthday Card


When the Carousel Birthday stamp set was first released in the Occasions 2017 catalogue, I was a bit skeptical as to how versatile the images would be, but having used them a couple of times now, it has become one of my favourites for younger girls through to their teens.  Everyone remembers going to the circus or fun park in their youth & riding atop the beautiful horses on the carousel, and this set evokes a happiness and youthful vibe about it which can be used for a range of occasions such as birthdays, thinking of you cards or general encouragement cards.

To make & assemble the card I used:

Card Base:
White Cardstock
Black Cardstock
Pop of Pink Speciality Designer Paper (retiring)
Gold Glimmer Paper  

Stamp Sets:
Carousel Birthday (Retiring)
Circle of Spring (used for the sentiment; retiring)

The sentiment "for you" was heat embossed in white, with gold ribbon trim (retired) placed behind.


I hope the projects you've seen here on my blog today have inspired you & brightened your day. You are currently visiting Seeds of Thoughtfulness with Lorin Goodchild. Please see the list below & hop through all of the people on the list to see all our projects. You don't want to miss any!


I chose to use a couple of items from both the 2016 Annual & the 2017 Occasions Catalogues which unfortunately are not being carried over onto the new catalogue coming 1st June 2017.  Some of these items may still be available through my Stampin' Up! Store but are strictly while supply lasts.  Remember to use the May Hostess Code WSA6VG6V at the bottom of your shopping cart to receive a free gift from me (only available to Australian residents).

Product List
Gold Cording Trim
Gold Cording Trim
[139618]
$8.75

Thanks for stopping by, until next time...

Lorin